Home Studio Setup with Andrew the Audio Scientist
Posted on August 13, 2014 by Scott Jacobi
Welcome to the latest musings from Andrew the Audio Scientist. Today, I'll be addressing the most essential component of a successful ACX audiobook production: constructing a home recording studio. You may be surprised to find how clean and clear your narration can sound after implementing just a few of the techniques and products below into your own studio setup. Let's take a look at the two main aspects of a solid studio arrangement.
The Room
The most important consideration when building your home studio is its location. The ideal recording space dimensions are rectangular (NOT square), with low ceilings and 90º corners. Closets and other enclosed spaces make perfectly great recording spaces after implementing a few basic room treatments.
Reflection absorption materials, such as the ones detailed on the ACX Beginners Amazon Wish List can make all the difference. The primary reflection points that should be addressed are any surfaces behind the microphone and on the side walls, at a distance exactly half-way between your sitting position and the microphone stand. If you want to go the DIY route, the same effect can be achieved by hanging your old winter coats on the walls, or even throwing up moving blankets where clothing is not an option. The idea is to use fabrics that are thick and provide ample absorption so that once sound hits the material, it stops dead in its tracks.
Isolation is an important consideration for your room, too. An important step in the audiobook production process is the pasting of clean room tone on top of edits and other extraneous noises. Doing so can be greatly inhibited, though, by a non-ideal recording space. You may find the room tone to be too noisy to affect any real sonic improvements. To combat this and other noise problems, make sure to isolate outside noises from your recording space by hanging blackout curtains at all windows, and insulating your room's open cracks and crevices. However, note that there are some rooms where even the most expensive room treatments are unlikely to make a big impact.
ACX Recommends:
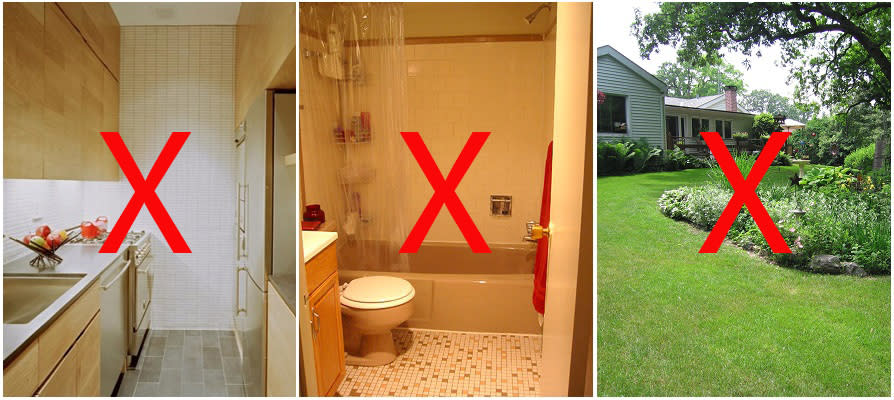
Avoid installing your studio in large rooms
such as kitchens and sun rooms. These will cause undesirable echo and reverberation, and result in a muddy sound.
Small rooms with reflective surfaces like bathrooms should also be avoided, because the porcelain and mirrors will send your voice flying across the room without remorse.
Last but not least, recording outdoors is a big no-no. While the sounds of nature can be pleasant, squawking birds and passing cars are not sounds that belong in audiobook productions.
THE MICROPHONE
This is pretty obvious – if you want to record your voice at home, you'll need a microphone. Not so obvious, however, is the kind of microphone you need to purchase. At ACX, we recommend a large-diaphragm cardioid condenser microphone. These microphones are typically more accurate and clean than other types of vocal microphones, but are also more sensitive to recording mistakes. You'll need to adhere to some setup best practices to get the most out of your purchase:
Placement
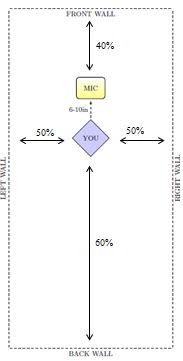
– A microphone is best set up at a point no further than 40% away from the front wall. Ideally, the microphone would be placed half-way between the side walls.
Height
– Microphones placed at or below mouth-level tend to pick up more “body” of a voice, while placement above the mouth (closer to the nasal cavity) capture a more “bright” and airy sound. However, this is a very personal aspect to studio configuration that is best left to experimentation.
Distance –
It is never necessary to stand the microphone further than 6-10 inches from your mouth. This should help you avoid plosives, but we strongly recommend purchasing a pop filter for your microphone if it does not already come with one. (For you DIYers, you can also construct your own pop filter out of – no joke – some pantyhose and flex tubing, as demonstrated in this Lifehacker article).
Interface –
All cardioid condenser microphones require an audio interface that can provide phantom power to the microphone. If phantom power is not provided to the microphone, then it will not work.
ACX Recommends:
One of our favorite starter microphones of this type is the Rode NT1-A, which can be found on the ACX Beginners Amazon Wish List. The NT1-A kit available on Amazon comes with a pop filter and all of the mounting hardware needed to get started. This, in conjunction with the Blue Icicle XLR-to-USB microphone interface and a solid microphone stand, provides an excellent starter ACX production system.
Following these basic rules for home studio setup will allow you to transform the appropriate area of your living space into a great sounding vocal booth. Check out Part 2 to see and hear examples of some real-life Audible Approved Producers home studios.